What is kind
kind, Kubernetes IN Docker - local clusters for testing Kubernetes. kind is an open source tool for running local Kubernetes clusters using Docker container “nodes”. kind was primarily designed for testing Kubernetes itself, but may be used for local development. kind bootstraps each “node” with kubeadm.

Differences between kind and kubekey
Generally, kind is similar to kubekey, both are used to provision a Kubernetes cluster to the target machines. Specifically, kind has unique scenarios and advantages when comparing with KK, because kind has good cross-platform support, it can provision a standard Kubernetes cluster in Mac/Win/Linux, it’s very easy to run KubeSphere anywhere.
kind runs Kubernetes in a Docker container, with a lightweight runtime containerd. kind packages the necessary dependencies (ebtables, socat, ipset, conntrack, etc.) into one docker image, which gracefully avoid the dependency problem. In addition, Kind will provision a default StorageClass with local storage built in. Typically, for users who want to install KubeSphere for a testing or development in their notebook, kind can used to provision both Kubernetes and KubeSphere in minutes.
My Environment
CentOS Linux release 7.6 on QingCloud Platform
Prerequisite
- Docker, see How to Install Docker on CentOS in China
- Kubectl, see Install and Set Up kubectl Tool
Download Kind
curl -Lo ./kind https://kind.sigs.k8s.io/dl/v0.8.1/kind-$(uname)-amd64
chmod +x ./kind
mv ./kind /some-dir-in-your-PATH/kind # e.g. mv ./kind /usr/local/bin/kind
Use Kind to Provision Kubernetes
Important: You have to configure the following three things in a configuration file for kind. To configure kind cluster creation, you will need to create a YAML config file. This file follows Kubernetes conventions for versioning etc.
- Create a a YAML config file:
vi config.yaml
-
Since the APIServer is only listening for 127.0.0.1, which means that APIServer cannot be accessed outside of the Kubernetes cluster which is provisioned by Kind. After creating a cluster, if you want to use kubectl to interact with the Kubernetes cluster by using the kubeconfig, you have to set the filed
apiServerAddressto the NodeIP (e.g.192.168.0.5). See the configuration innetworking. -
For users who download images slowly from DockerHub, it is recommended to configure the image accelerator. See the configuration in
containerdConfigPatches. -
Since Kind will provision things in a docker container, it will cause the service exposing problem. Generally, you need to map ports to the host machine. You can map extra ports from the nodes to the host machine with
extraPortMappings.
config.yaml
Fill out the config.yaml with the following configuration.
kind: Cluster
apiVersion: kind.x-k8s.io/v1alpha4
nodes:
- role: control-plane
  extraPortMappings:
  - containerPort: 30880  # Enter the port you want to map it from the nodes to the host
    hostPort: 30880  # Enter the port you want to map it from the nodes to the host
    listenAddress: "0.0.0.0" # Optional, defaults to "0.0.0.0"
    protocol: tcp # Defaults to tcp, you can use udp as you need
networking:
  apiServerAddress: "192.168.0.5" # Enter the APIServer IP
containerdConfigPatches:
- |-
  [plugins."io.containerd.grpc.v1.cri".registry.mirrors."docker.io"]
    endpoint = ["https://12345.mirror.aliyuncs.com/"]  # replace it with your own image accelerator
- To specify a configuration file when creating a cluster, use the –config flag:
kind create cluster --config config.yaml
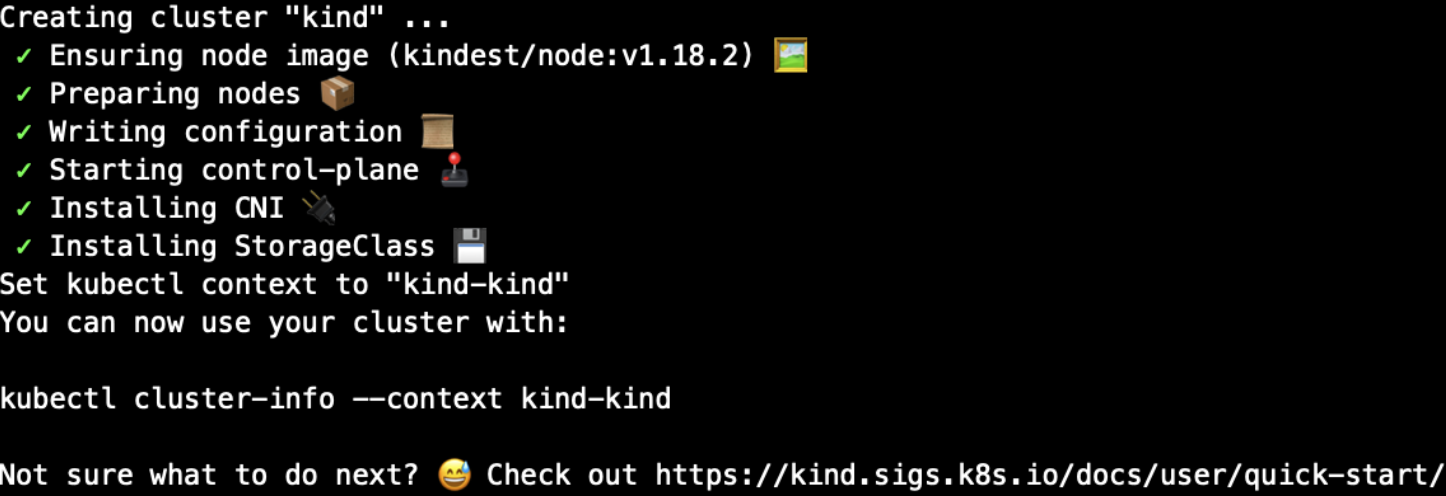
- Verify the installation:
$ kubectl get pod --all-namespaces

kube-system                    coredns-66bff467f8-984xp                             1/1     Running             0          58m
kube-system                    coredns-66bff467f8-bh5sm                             1/1     Running             0          58m
kube-system                    etcd-kind-control-plane                              1/1     Running             0          59m
kube-system                    kindnet-2t5rx                                        1/1     Running             0          58m
kube-system                    kube-apiserver-kind-control-plane                    1/1     Running             0          59m
kube-system                    kube-controller-manager-kind-control-plane           1/1     Running             3          59m
kube-system                    kube-proxy-g8mqj                                     1/1     Running             0          58m
kube-system                    kube-scheduler-kind-control-plane                    1/1     Running             3          59m
kube-system                    metrics-server-678d5c87c-x4j5k                       1/1
local-path-storage             local-path-provisioner-bd4bb6b75-xt9zg               1/1     Running             1          58m
- As you can find that Kind create a default StorageClass
local-pathto provision local storage. This is quite convenient for the Pods that need to bind PVC.
$ kubectl get sc
NAME                 PROVISIONER             RECLAIMPOLICY   VOLUMEBINDINGMODE      ALLOWVOLUMEEXPANSION   AGE
standard (default)   rancher.io/local-path   Delete          WaitForFirstConsumer   false                  61m
Install KubeSphere on Kubernetes Cluster
At this point, you have a Kubernetes Cluster provisioned by Kind. Next, this is very easy to install KubeSphere on an existing cluster. Plese refer to To Start Deploying KubeSphere.
Important: KubeSphere v3.0 supports multi-cluster management, you can set the kind cluster as a host or a member cluster as you want. Make sure you configure the cluster role in ClusterRole before deploy KubeSphere. Note that we set the kind cluster as a
hostin this blog.
cluster-configuration.yaml
···
multicluster:
  clusterRole: none  # host | member | none
···
Import Kind Cluster as host
After you installed KubeSphere on an existing Kubernetes cluster, you can import it to the multi-cluster control plane of KubeSphere. Since we set the kind cluster as a host before, we can easily to import the host cluster itself to KubeSphere.
- Obtain the kubeconfig file.
cat $HOME/.kube/config

apiVersion: v1
clusters:
- cluster:
    certificate-authority-data: LS0tLS1CRUdJTiBDRVJUSUZJQ0FURS0tLS0tCk1JSUN5RENDQWJDZ0F3SUJBZ0lCQURBTkJna3Foa2lHOXcwQkFRc0ZBREFWTVJNd0VRWURWUVFERXdwcmRXSmwKY201bGRHVnpNQjRYRFRJd01EY3dOakl6TVRVek9Wb1hEVE13TURjd05ESXpNVFV6T1Zvd0ZURVRNQkVHQTFVRQpBeE1LYTNWaVpYSnVaWFJsY3pDQ0FTSXdEUVlKS29aSWh2Y05BUUVCQlFBRGdnRVBBRENDQVFvQ2dnRUJBTnJoCk45ejNXVkp4cUxudS84UjQ2SWNla04xOENYbTdOUVhBWGhEZ1MvOUszR2RqczQ0NldDQUNxOE5IbDhKYnE5RXEKZkVVMkZmdUZkTnBGNVpBQm9OaXZzR2tOdkV0QVFqTE5nUDdHTjNxb0FuQ3ZLN05teVFvQWdtVjBBM05PRkZGagpPY0NaTi9qQlNoRWtyR1VYRjlFRGR1cUQvbjdmQytGV1RQOFZaL2ozMFNGMkcySWR2cmdnUU5uZXdrbjE3M00xCnNzc0pRNVZncnRNdEVaaXdjN2ZlT0lEbEsyclJ3NzRYWVR0V256V3VCc2tCYnFIbVNzTi9WNlVVS2xpWG1JWWsKL1NvOEhBK2ZmcVZhQmo4ZzluUVJGY2VleTIzWVdxODcyVndNeGF6WDdaQ3NCTGxpelNaQWpPT09uYnRQODRsMQo5K0lIUys0bjVTRXJxcHNlams4Q0F3RUFBYU1qTUNFd0RnWURWUjBQQVFIL0JBUURBZ0trTUE4R0ExVWRFd0VCCi93UUZNQU1CQWY4d0RRWUpLb1pJaHZjTkFRRUxCUUFEZ2dFQkFFSGJHV2FwRlBNb1NscWw2d2ZQbW91K2xyQU0KajF3dE96ZGkxbUt3QWY1Nm1DRkFmYnhaUURrNCtTUmhieFRCKzFRRzF4L3BJQ0liaFdtbE81OXVEUExPeUl3Vgpkb3A0TEFnTUR2Q1A4ZS9OanRzVnNzT0JiUFdqWmpwU3d0V3ArQU5XWXgyd3ZEQWl2SllmeWVGVE5QVGFXUzdkCmsyb1VMTnBXVTN3cGNhMGZ0d3o2aVUzemhOMytLN3FOcWxvRDRJUjlUazVjdWNHWWlQYytJSzl2cWs5aEJrbk8KVjRuWmYxcVMxUmVQQWRiY292SDJLQU5WN1BrbExOendnQWYzT1BzblNYcVRXT1NMNExGQks4SWpaSXZzaDJSRwprWSt6aWV5OGdFYjhXOUdtWDVFOVE3d0oxNHZJSlhxR0pyRVRhaG9aNHc1cUFMSlA2Q25Db05WaEh1ST0KLS0tLS1FTkQgQ0VSVElGSUNBVEUtLS0tLQo=
    server: https://192.168.0.5:42786
  name: kind-kind
contexts:
- context:
    cluster: kind-kind
    user: kind-kind
  name: kind-kind
current-context: kind-kind
kind: Config
preferences: {}
users:
- name: kind-kind
  user:
    client-certificate-data: LS0tLS1CRUdJTiBDRVJUSUZJQ0FURS0tLS0tCk1JSUM4akNDQWRxZ0F3SUJBZ0lJVmZKOHAvOFJUL0F3RFFZSktvWklodmNOQVFFTEJRQXdGVEVUTUJFR0ExVUUKQXhNS2EzVmlaWEp1WlhSbGN6QWVGdzB5TURBM01EWXlNekUxTXpsYUZ3MHlNVEEzTURZeU16RTFORGhhTURReApGekFWQmdOVkJBb1REbk41YzNSbGJUcHRZWE4wWlhKek1Sa3dGd1lEVlFRREV4QnJkV0psY201bGRHVnpMV0ZrCmJXbHVNSUlCSWpBTkJna3Foa2lHOXcwQkFRRUZBQU9DQVE4QU1JSUJDZ0tDQVFFQXdvOWxiV0hWWXVseGNvdkgKT0twZmdQL1dLVm9xNWNSMVhKc0VwT05pcTBUZ2o1ekVGdjJPYnNZMXI1L1YvdXZCYTFSVnVSRmM4UzNHR1p0UQpybHhFc3hqZ0F6a1dlK0Vjd1pnT3dMeFlJSzlCS0dYc21QV012WkxVK0xRZEo4WG9PMG5PM1pyU2JtRy82YnpTCk13S3B6SzAvVUs0V3pxclFncWQ2MmQrWjc0Y0VjRzg5RSs1elBwRmszWkk2VFVtNUlveVkrcWpIT1FJWWhGbDgKY3hVY1RVU1ZGQk5PTldOaDNZZkhCUWdjNjY3TWhubll0ZFIrQ0ZtYWUxTFpGbjRTZm5mZ2M3TjVYSHN0ZDJzbApWY2xyVW5pUkMzTTJQWjlCOHpGRXFuRit2akFLK3BoQmlDMHliTlJJU3ZNUE45TDh2ZTl6akRJS3lObVpzSFNhClNzdFd1UUlEQVFBQm95Y3dKVEFPQmdOVkhROEJBZjhFQkFNQ0JhQXdFd1lEVlIwbEJBd3dDZ1lJS3dZQkJRVUgKQXdJd0RRWUpLb1pJaHZjTkFRRUxCUUFEZ2dFQkFOblZvUWJyQmJXaW1ZbU5HeUJXQlZTY0kwMXNQaVJiS0xLUgpFTTUxYWQ3SFoxR01PaDY3YzhEVno3TVZtMUtjU2RhaituUlMzcnRWdzZicCt0M1NXTTdwUXJEME9zUlZ4bGVvClRQTktDbGJ5NVp6bUFjNVJ1TzBmM0hmdDVjS0x1ZkEwR0lkWWVTOE9HL2ZVSjZoaktqbkxjWkRQN1dBbTczajMKVG5ZaU9RMjIrQXF5QVNYUkhkVWpQMkJZNEIrZUI5TFd6ejQ5Z1lTTExjUk50a2FmQjlaRHZkd1padFlBRFcrNApWQjUwNDBFV3NRajloT0doQVJmVjNVZG81TTVoSHRSNFA0RFJRK1dCQUt0YjZlMmp6eEpNVjB5YkRjVWl6MVZRCklRVjZkeVdEN3lqTFhUWXZlVExiSGhxanl0V04rdTgrYjk3NzRXRzdZYUpYekZJR3lLTT0KLS0tLS1FTkQgQ0VSVElGSUNBVEUtLS0tLQo=
    client-key-data: LS0tLS1CRUdJTiBSU0EgUFJJVkFURSBLRVktLS0tLQpNSUlFb3dJQkFBS0NBUUVBd285bGJXSFZZdWx4Y292SE9LcGZnUC9XS1ZvcTVjUjFYSnNFcE9OaXEwVGdqNXpFCkZ2Mk9ic1kxcjUvVi91dkJhMVJWdVJGYzhTM0dHWnRRcmx4RXN4amdBemtXZStFY3daZ093THhZSUs5QktHWHMKbVBXTXZaTFUrTFFkSjhYb08wbk8zWnJTYm1HLzZielNNd0twekswL1VLNFd6cXJRZ3FkNjJkK1o3NGNFY0c4OQpFKzV6UHBGazNaSTZUVW01SW95WStxakhPUUlZaEZsOGN4VWNUVVNWRkJOT05XTmgzWWZIQlFnYzY2N01obm5ZCnRkUitDRm1hZTFMWkZuNFNmbmZnYzdONVhIc3RkMnNsVmNsclVuaVJDM00yUFo5Qjh6RkVxbkYrdmpBSytwaEIKaUMweWJOUklTdk1QTjlMOHZlOXpqRElLeU5tWnNIU2FTc3RXdVFJREFRQUJBb0lCQVFDOEV0SUJRcWw3ekI0VwpsSGdvbHNscmNlUWNaVVZDaHY3TVhpM0hGdWV5bUFwYnlUYms0b1psSHNXVzEvT05VV2pQejk1dDRCTHdNVWRtClNYVmNsMlR4bkFJd0cyZFlxT3ViV05vcUJlZEs4UjhUWmpPb1NQV2I2K3hqM2ZpeEVlYkVLVDBIaXpvUDZmNFMKZkt6VkVxWUJiUmZmYmVvdUxZRVNTOE8rQ1NCTklZNGtGZk9CbGNUeGZQWEFVZGJDelpwWUJyaC81dVc4dldEZQpMNVo3OThZc3BiZGplczZkRVlXeXE4UUZJVE5UbnBOZ1g3aXVCc1BsR1o2SWxGT3lsaTdmcFliSFpWenhBcnFMCkNTRG9xMjJZTEpQUHE5MGtmZ2oxbC9WUDRVcE83dGV6VXdnZy9lN3Z2YmR1M3F2K1c4eW1GQzA4ekc0ZnllbnQKRnhNTWdPQUJBb0dCQVBTcEYyUVZSN25nbVJRbzRIem8wM1p2clVpblpDaWJZdzEzUEliN0tkUmRUeUd6ZXhOcQowRzRkTVhvU3VIYSsvUWRZUFd6RmxqK29YcmFab2M4KzJEdlh1Y0RnK0RSUThhNWNBQ21PRnE2MEREWlc5aGpECkp5YSs0MzFIaXJId1NDR1dXRUV5S0VibUxES0FIdjlER09vejFSTllQNXZneHJUS0I2NWZiSHVCQW9HQkFNdVQKM0kyTGJuc0N2QTlxYUdTU0R1T3Fmc2hENGZkVzZLbUJYRHlqaVNCcVhkb0MvNG9POGh6U2lBNit3cUt5TXRNdQp2YUV3elpOQU5sdVVyU1JTcFVoenh1dzNybHFFV0hsVVhTR3BFUk10Uk5XUVlXUWsrNS9Ea3lRN0pRVnczUDJXCllPM0wwK2wvci9ud29HeU5xdzkxOWJRR0VWdlEvZkJwbzFQdksxYzVBb0dBS0pSYk10aHN1eUhMZ2hKOW1Yb3MKaUxwaExXbkdMUTRJMGRUekR4aGRpY0dvUEZpK2t5dm1RajFKVll3QldJQzVDeHpSbzFicVlzaVVYUWtDVTVPQwozZm9iN3lmaFF4d2gyZCtjajBmbjd6WWh5R21JQy9kaWFRVEVTcVV4RmU1YXFHZDlYK0xuMTBxYURnNCtGZXlWCkYxTmRoZ1hmRndXakw1MUt4TnRDN1FFQ2dZQkNCS2hnaXBnQWNrbVVZamlLYk1kQlUzZ2I3OCtteTF0V0pPcEoKaStzYlJRTThnUDVud2lNSDc4cEpwZGt1czhWQnNRV3o4VVNwZlFoanVKcFJqaStsaUU0NUtuRnpUem4xMXNNQQorSGZlRlM4ZVp0eitnZlBMd3J2RDR4NUZYbTE4R3psQnhIanJYd290YnJoSG04V2VsTzFpUFJtQ0FndG4zSW9uCjNRYmNHUUtCZ0RYQytvZ3Facjlxa0h1SUZZQWYwL0hPRmhBLzFxOTQ5QXpEY3hiRnQzNUlzVUtxWDY0Z3Q1U2IKZFpNN0ZtdW1DK3BFV3pQaTF3aGc2eUtWeHlobmZHdStlYUpIaVN4VStEaDVnVkJNSjEwNzdUZVhMVWZRUk9ldgpzNVZ0ank1dFp2bW4xK1NHNnZLcG5RUWJNWUNsWmQzYmE4TXpNSGZvUlN3VU1MMDdVemtiCi0tLS0tRU5EIFJTQSBQUklWQVRFIEtFWS0tLS0tCg==
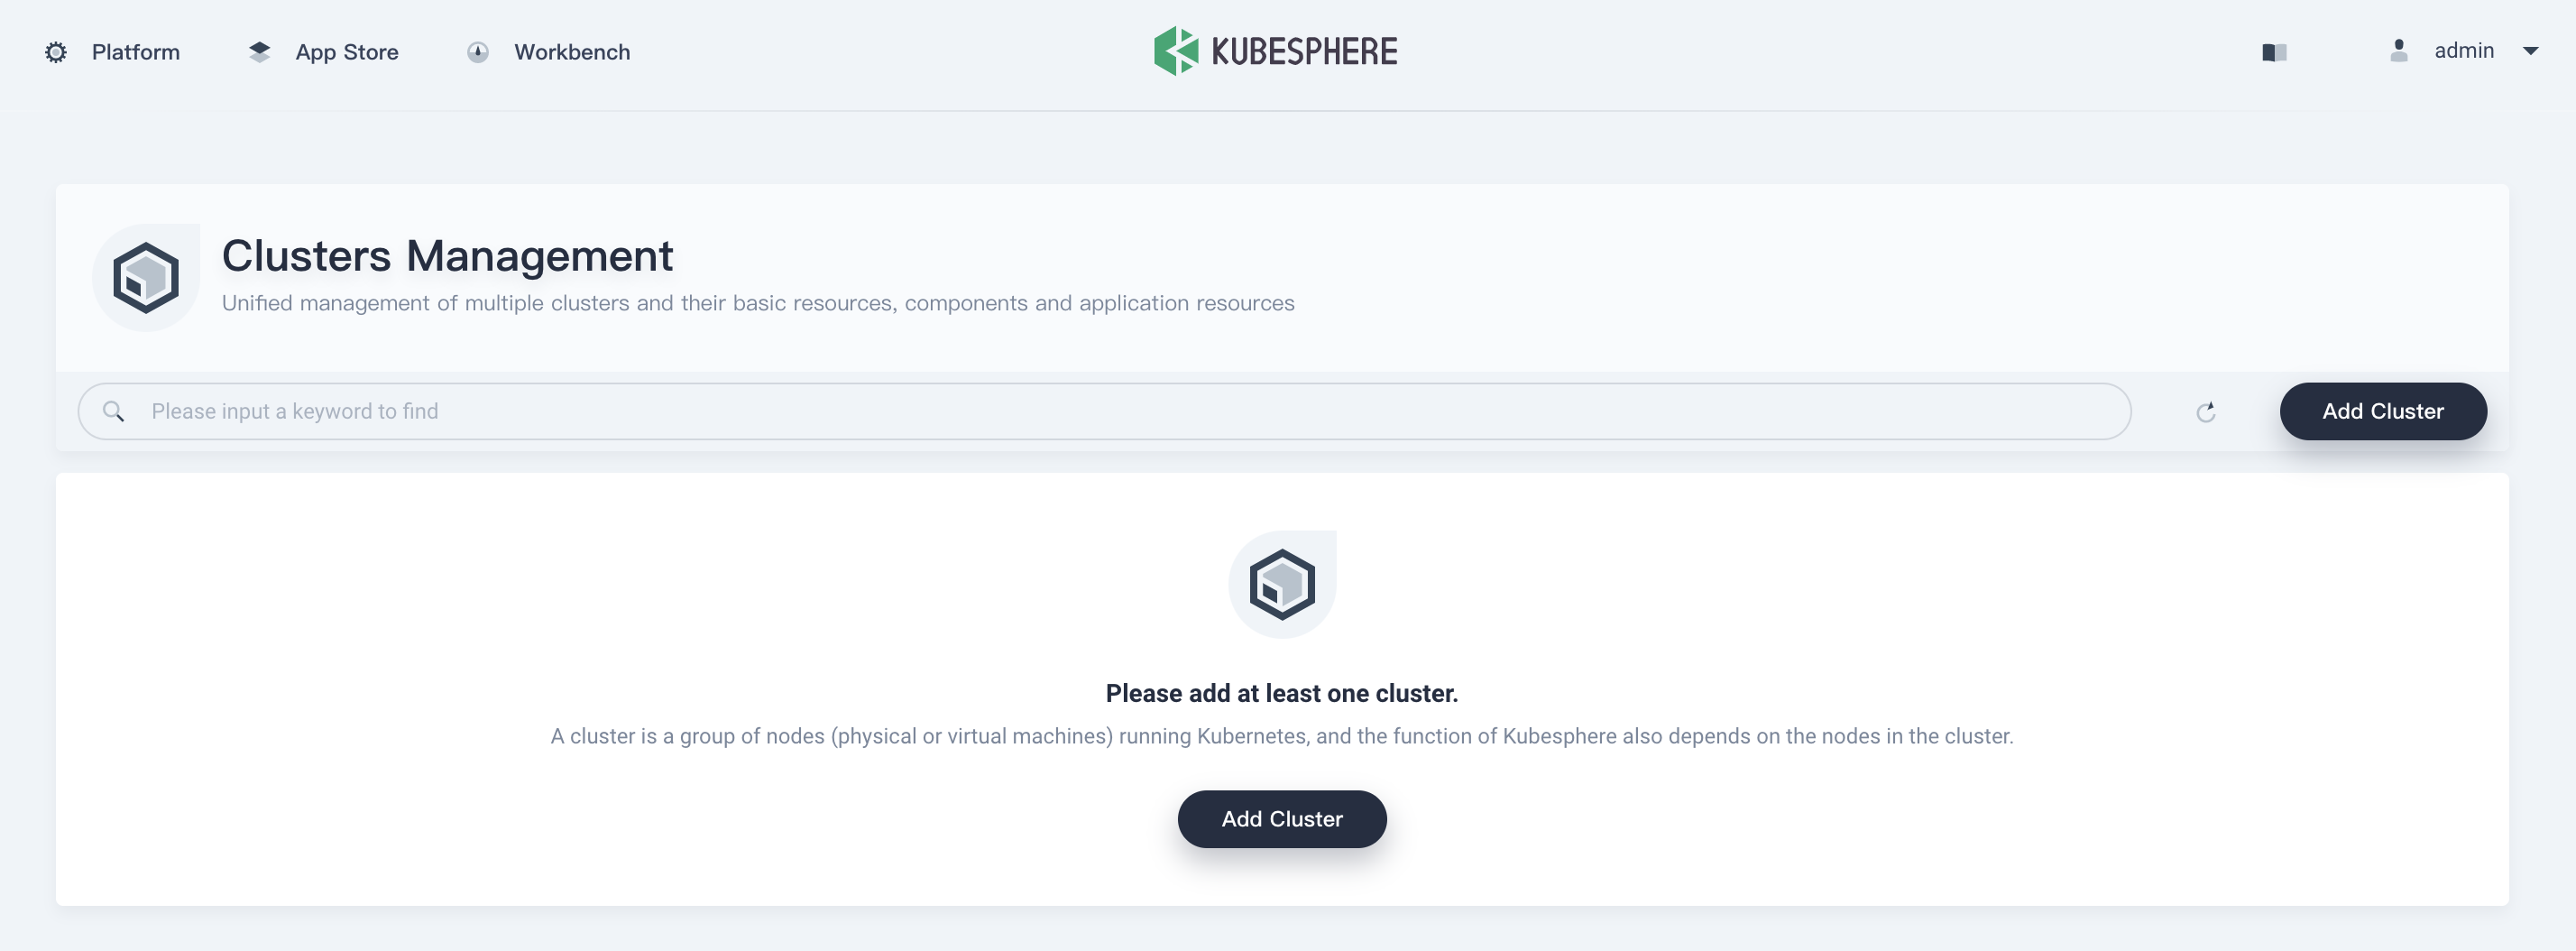
- Back to KubeSphere, click Add Cluster.
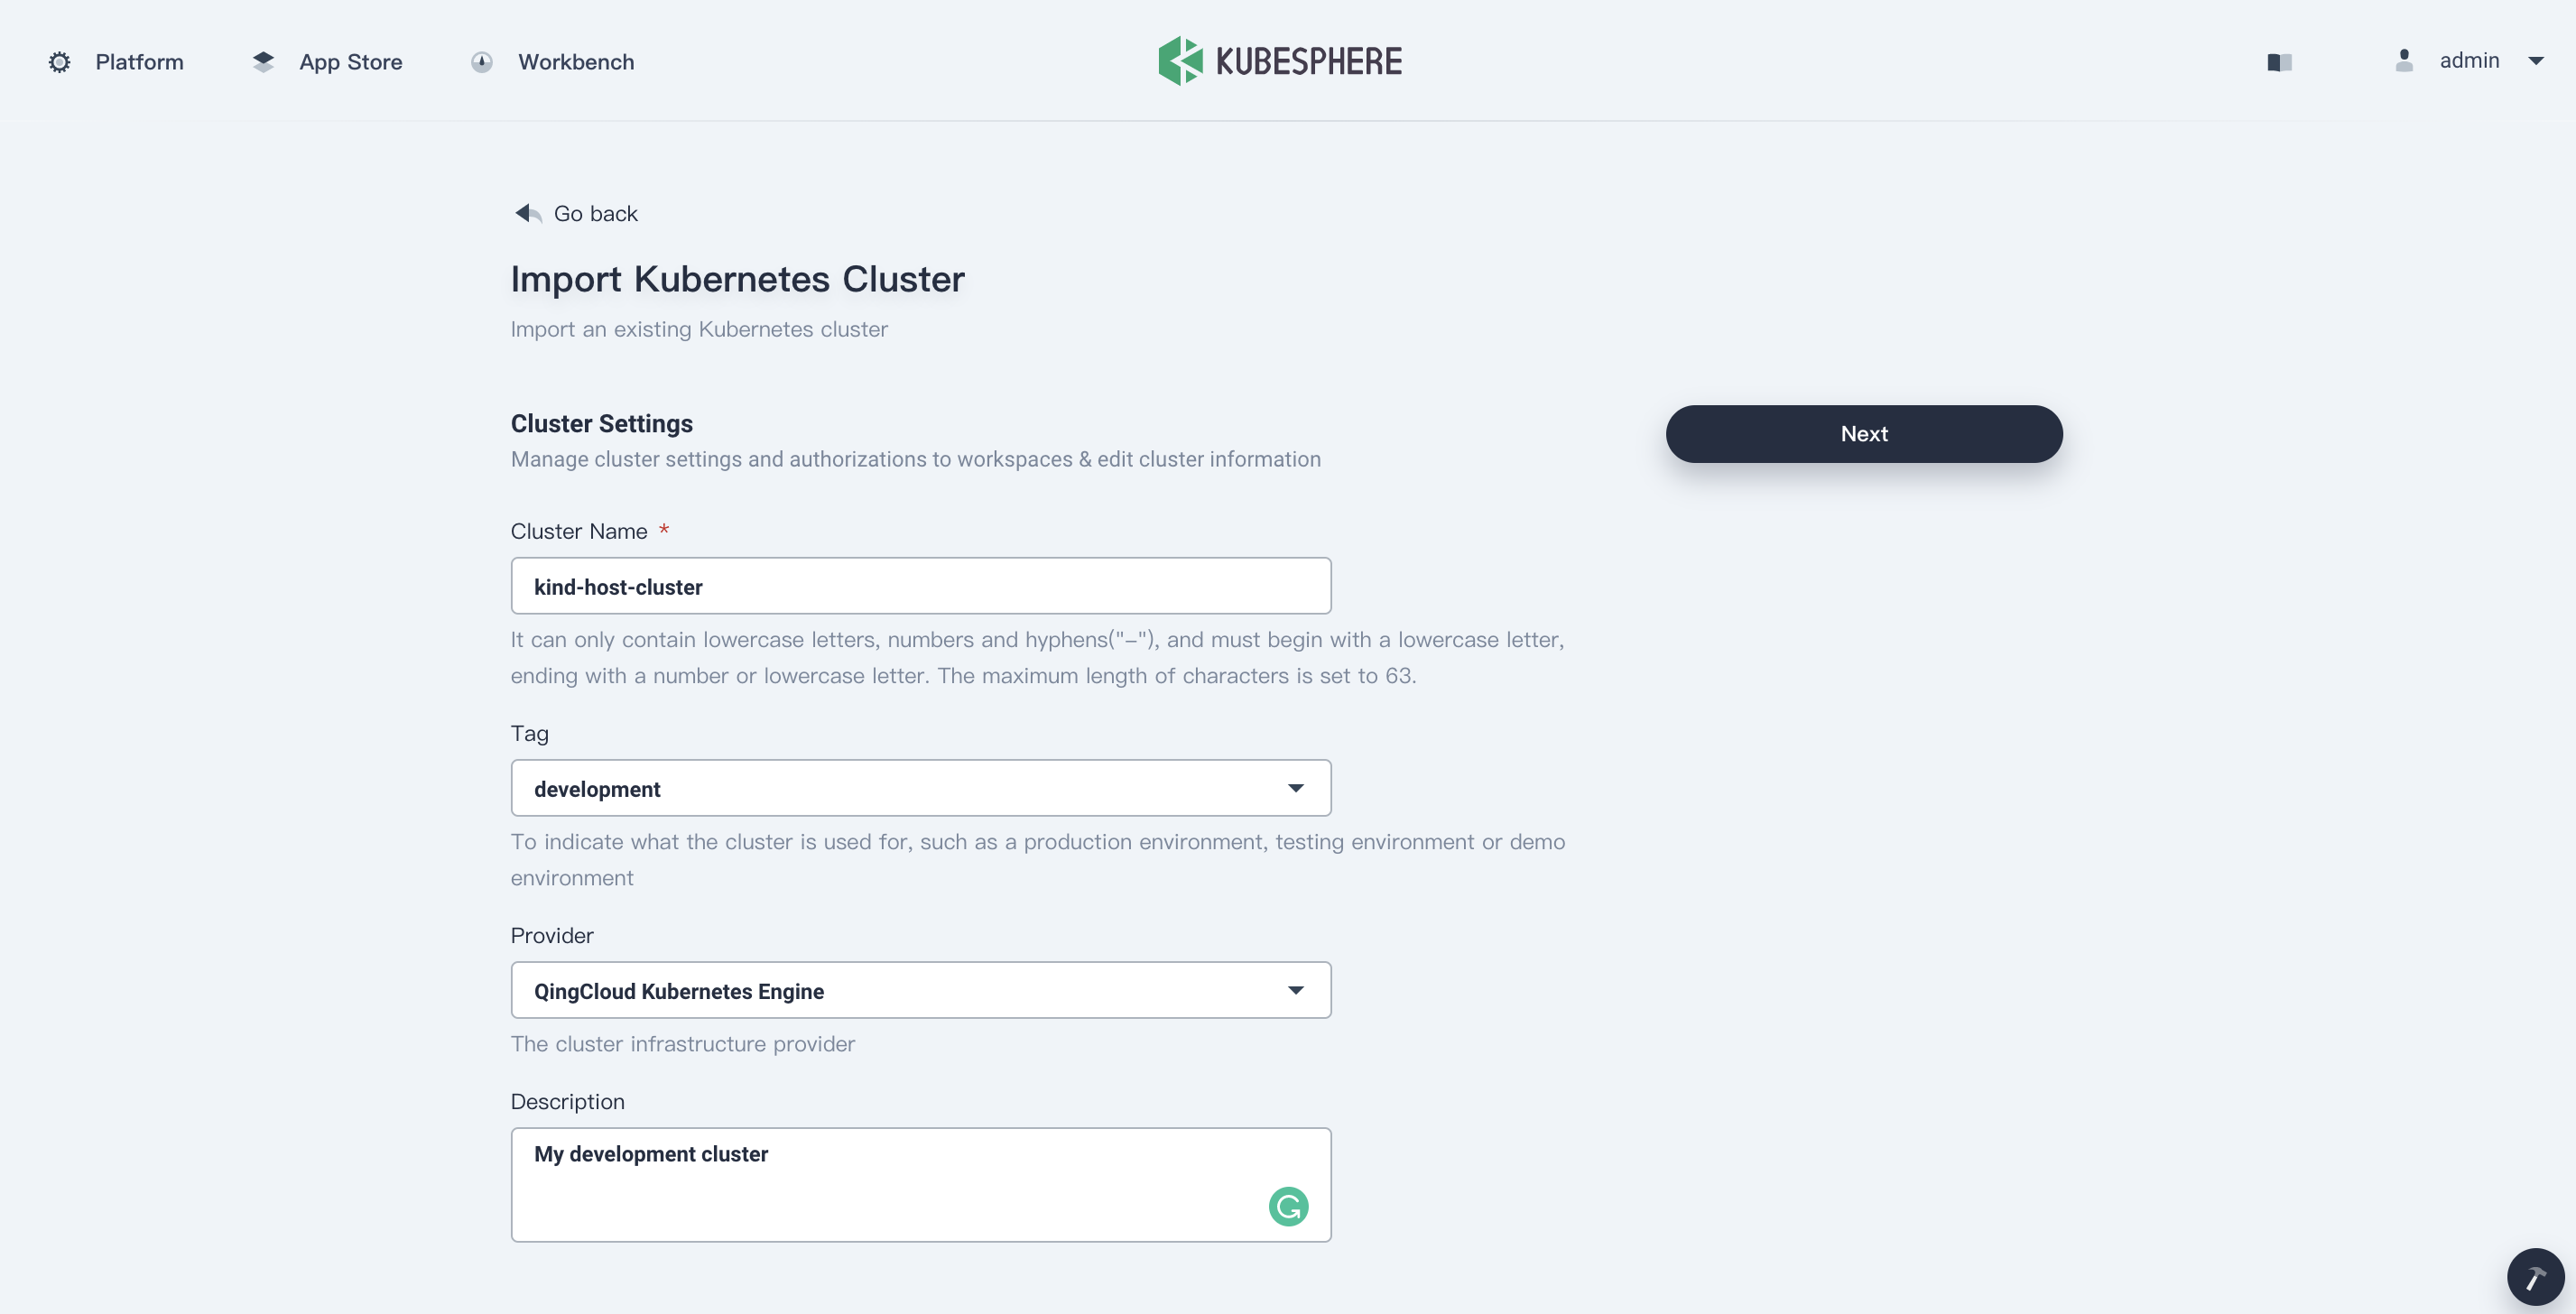
- Fill out the cluster name, and choose the Tag and Provider as you want, then click Next.
-
Copy and paste the kubeconfig to the multi-cluster control plane of KubeSphere:
-
Keep the Connection Method as Direct connection to Kubernetes cluster. Copy and paste the kubeconfig into the blank, then click Import to import the target cluster into KubeSphere.

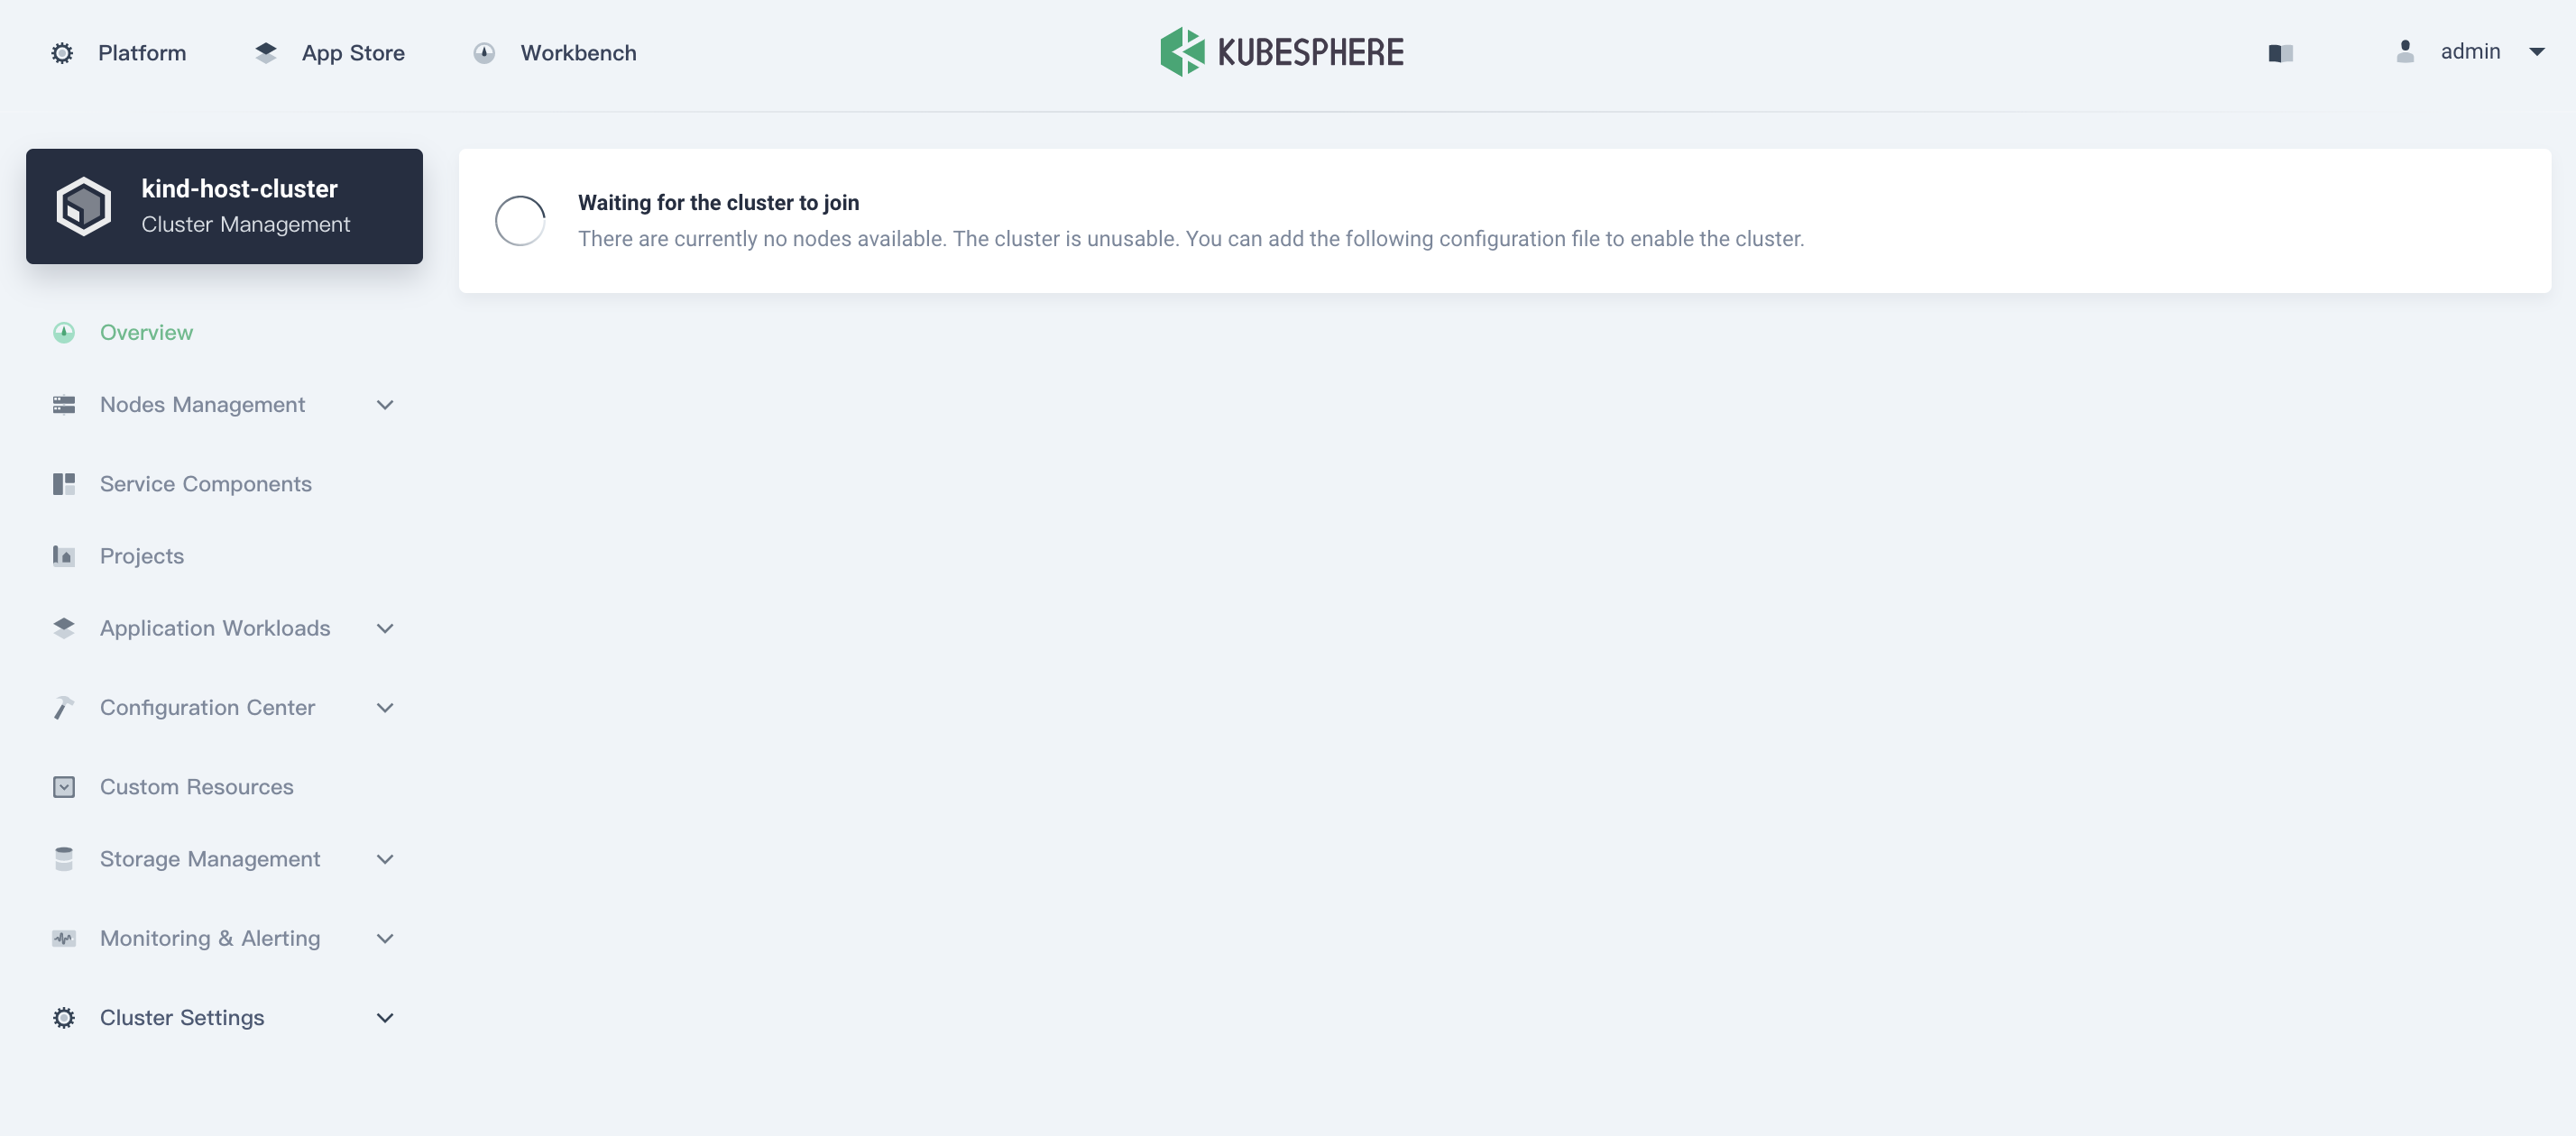
- Wait for seconds, the cluster will be joined in a while.
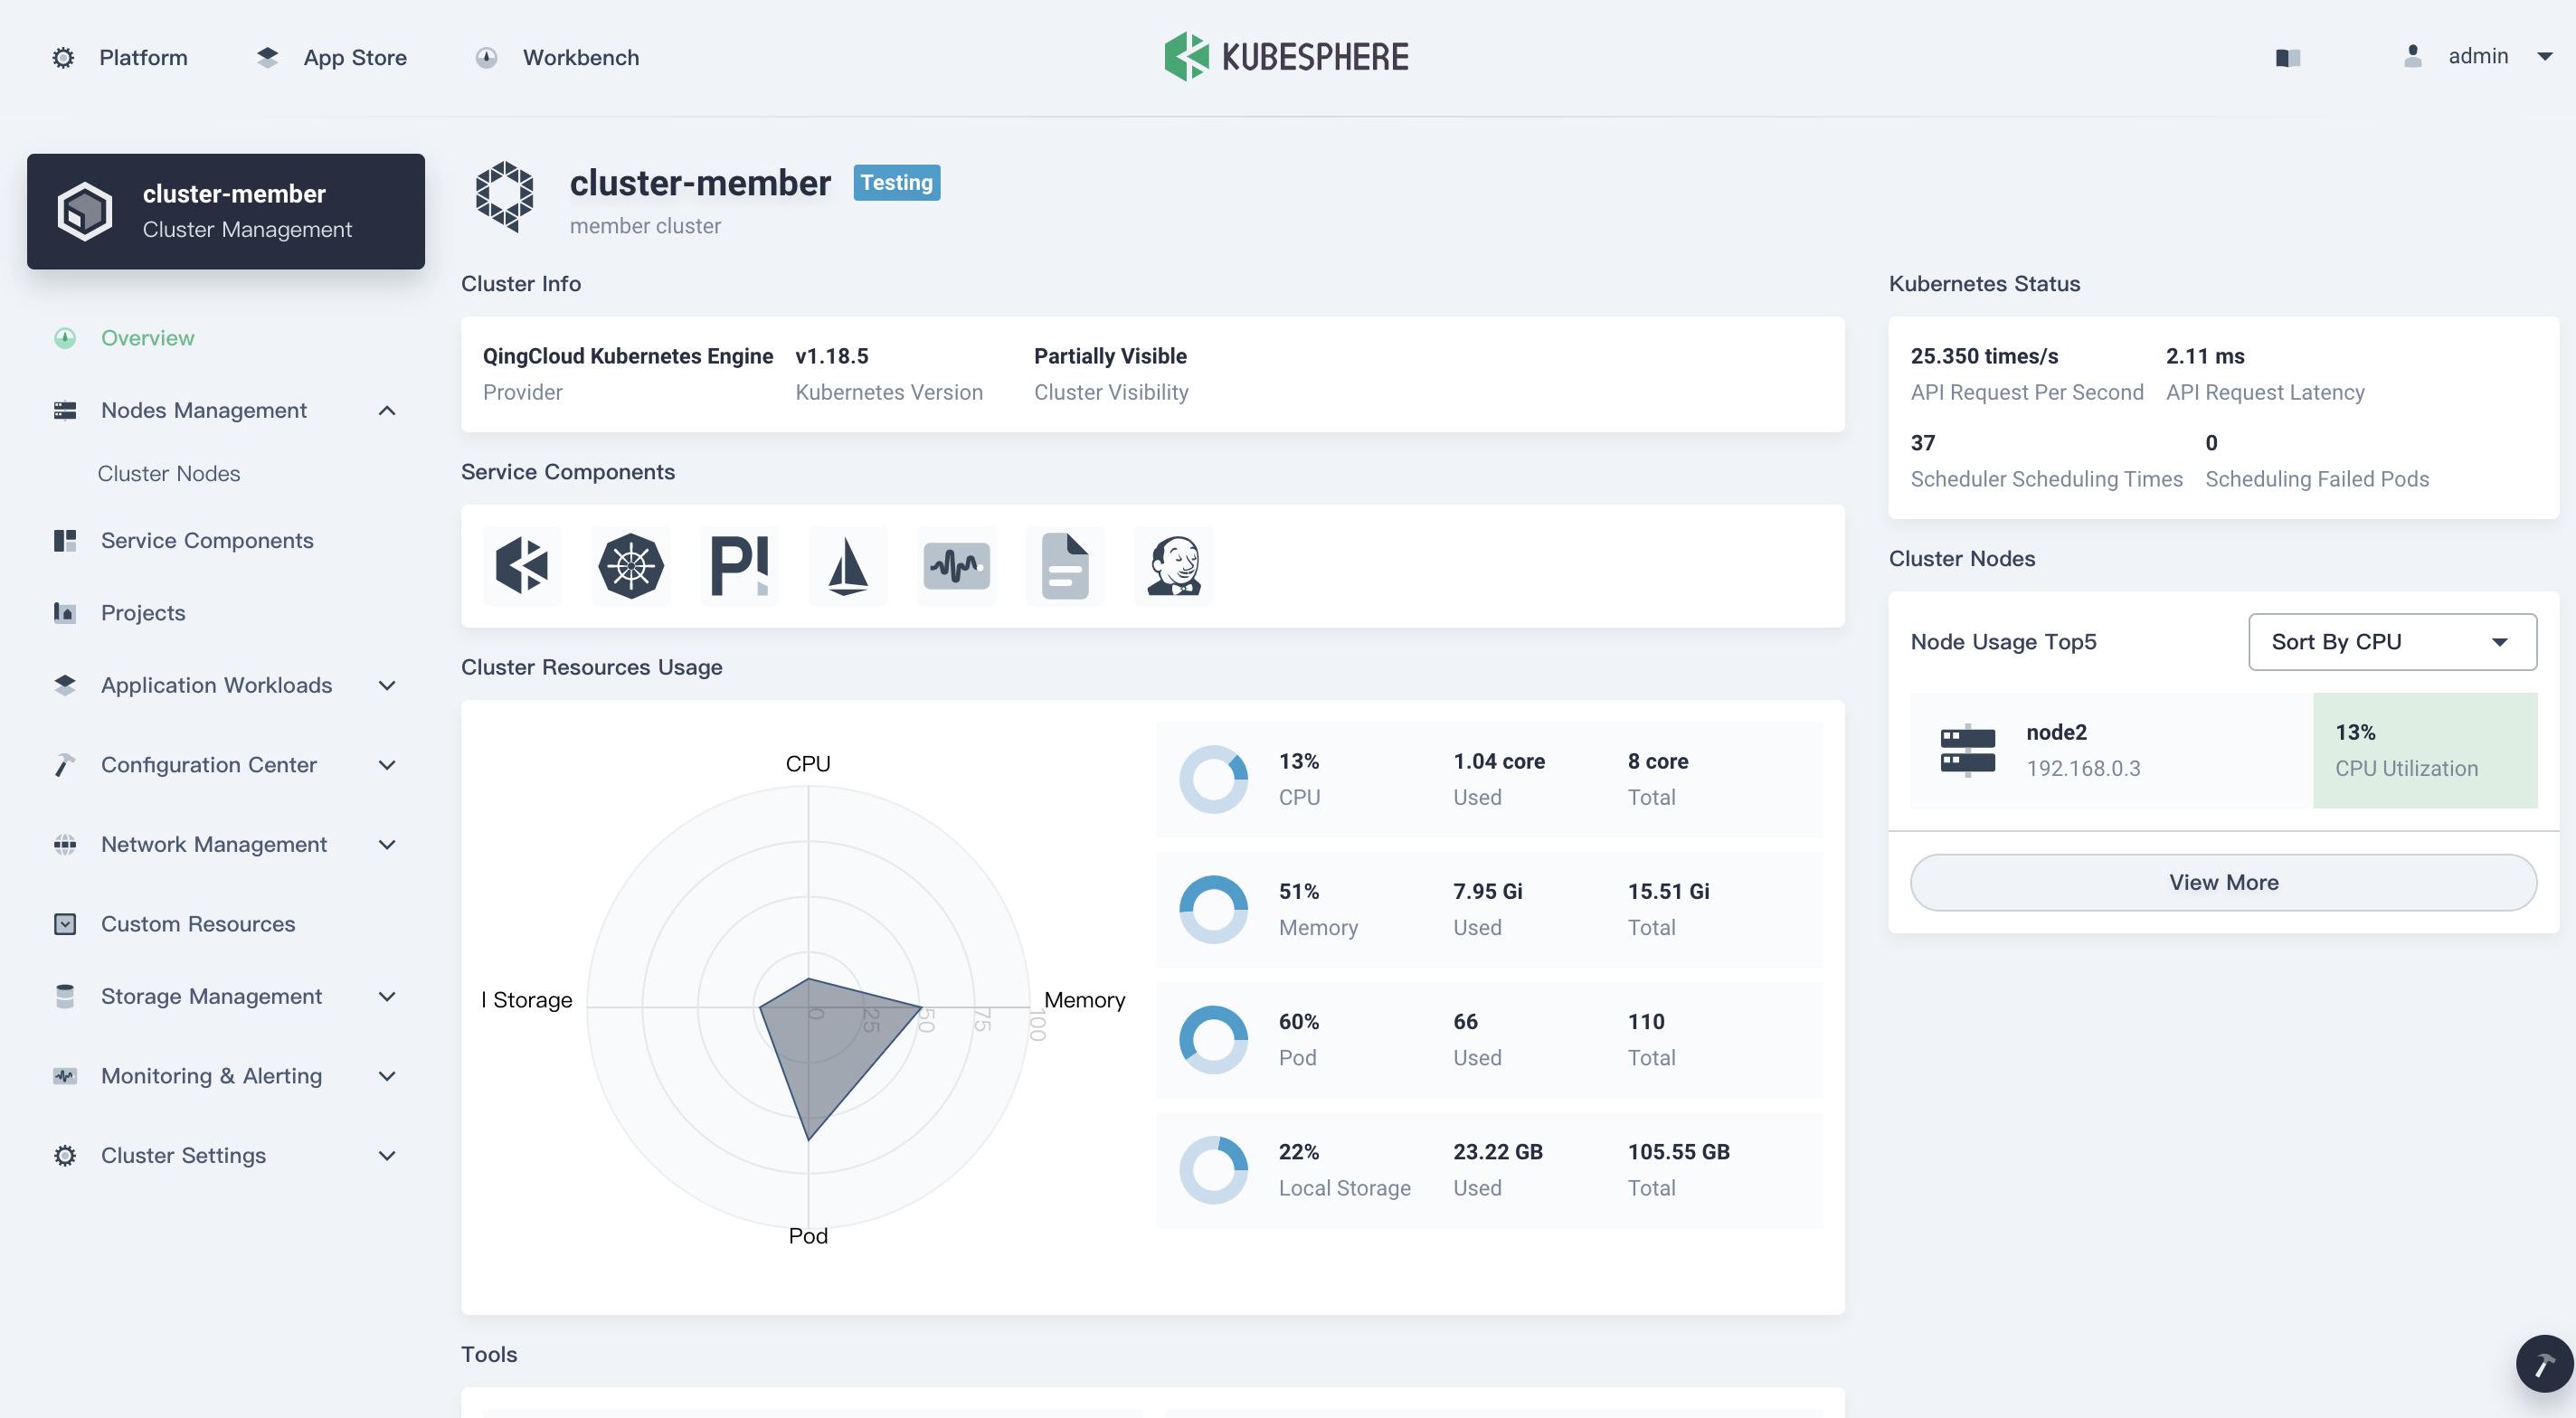
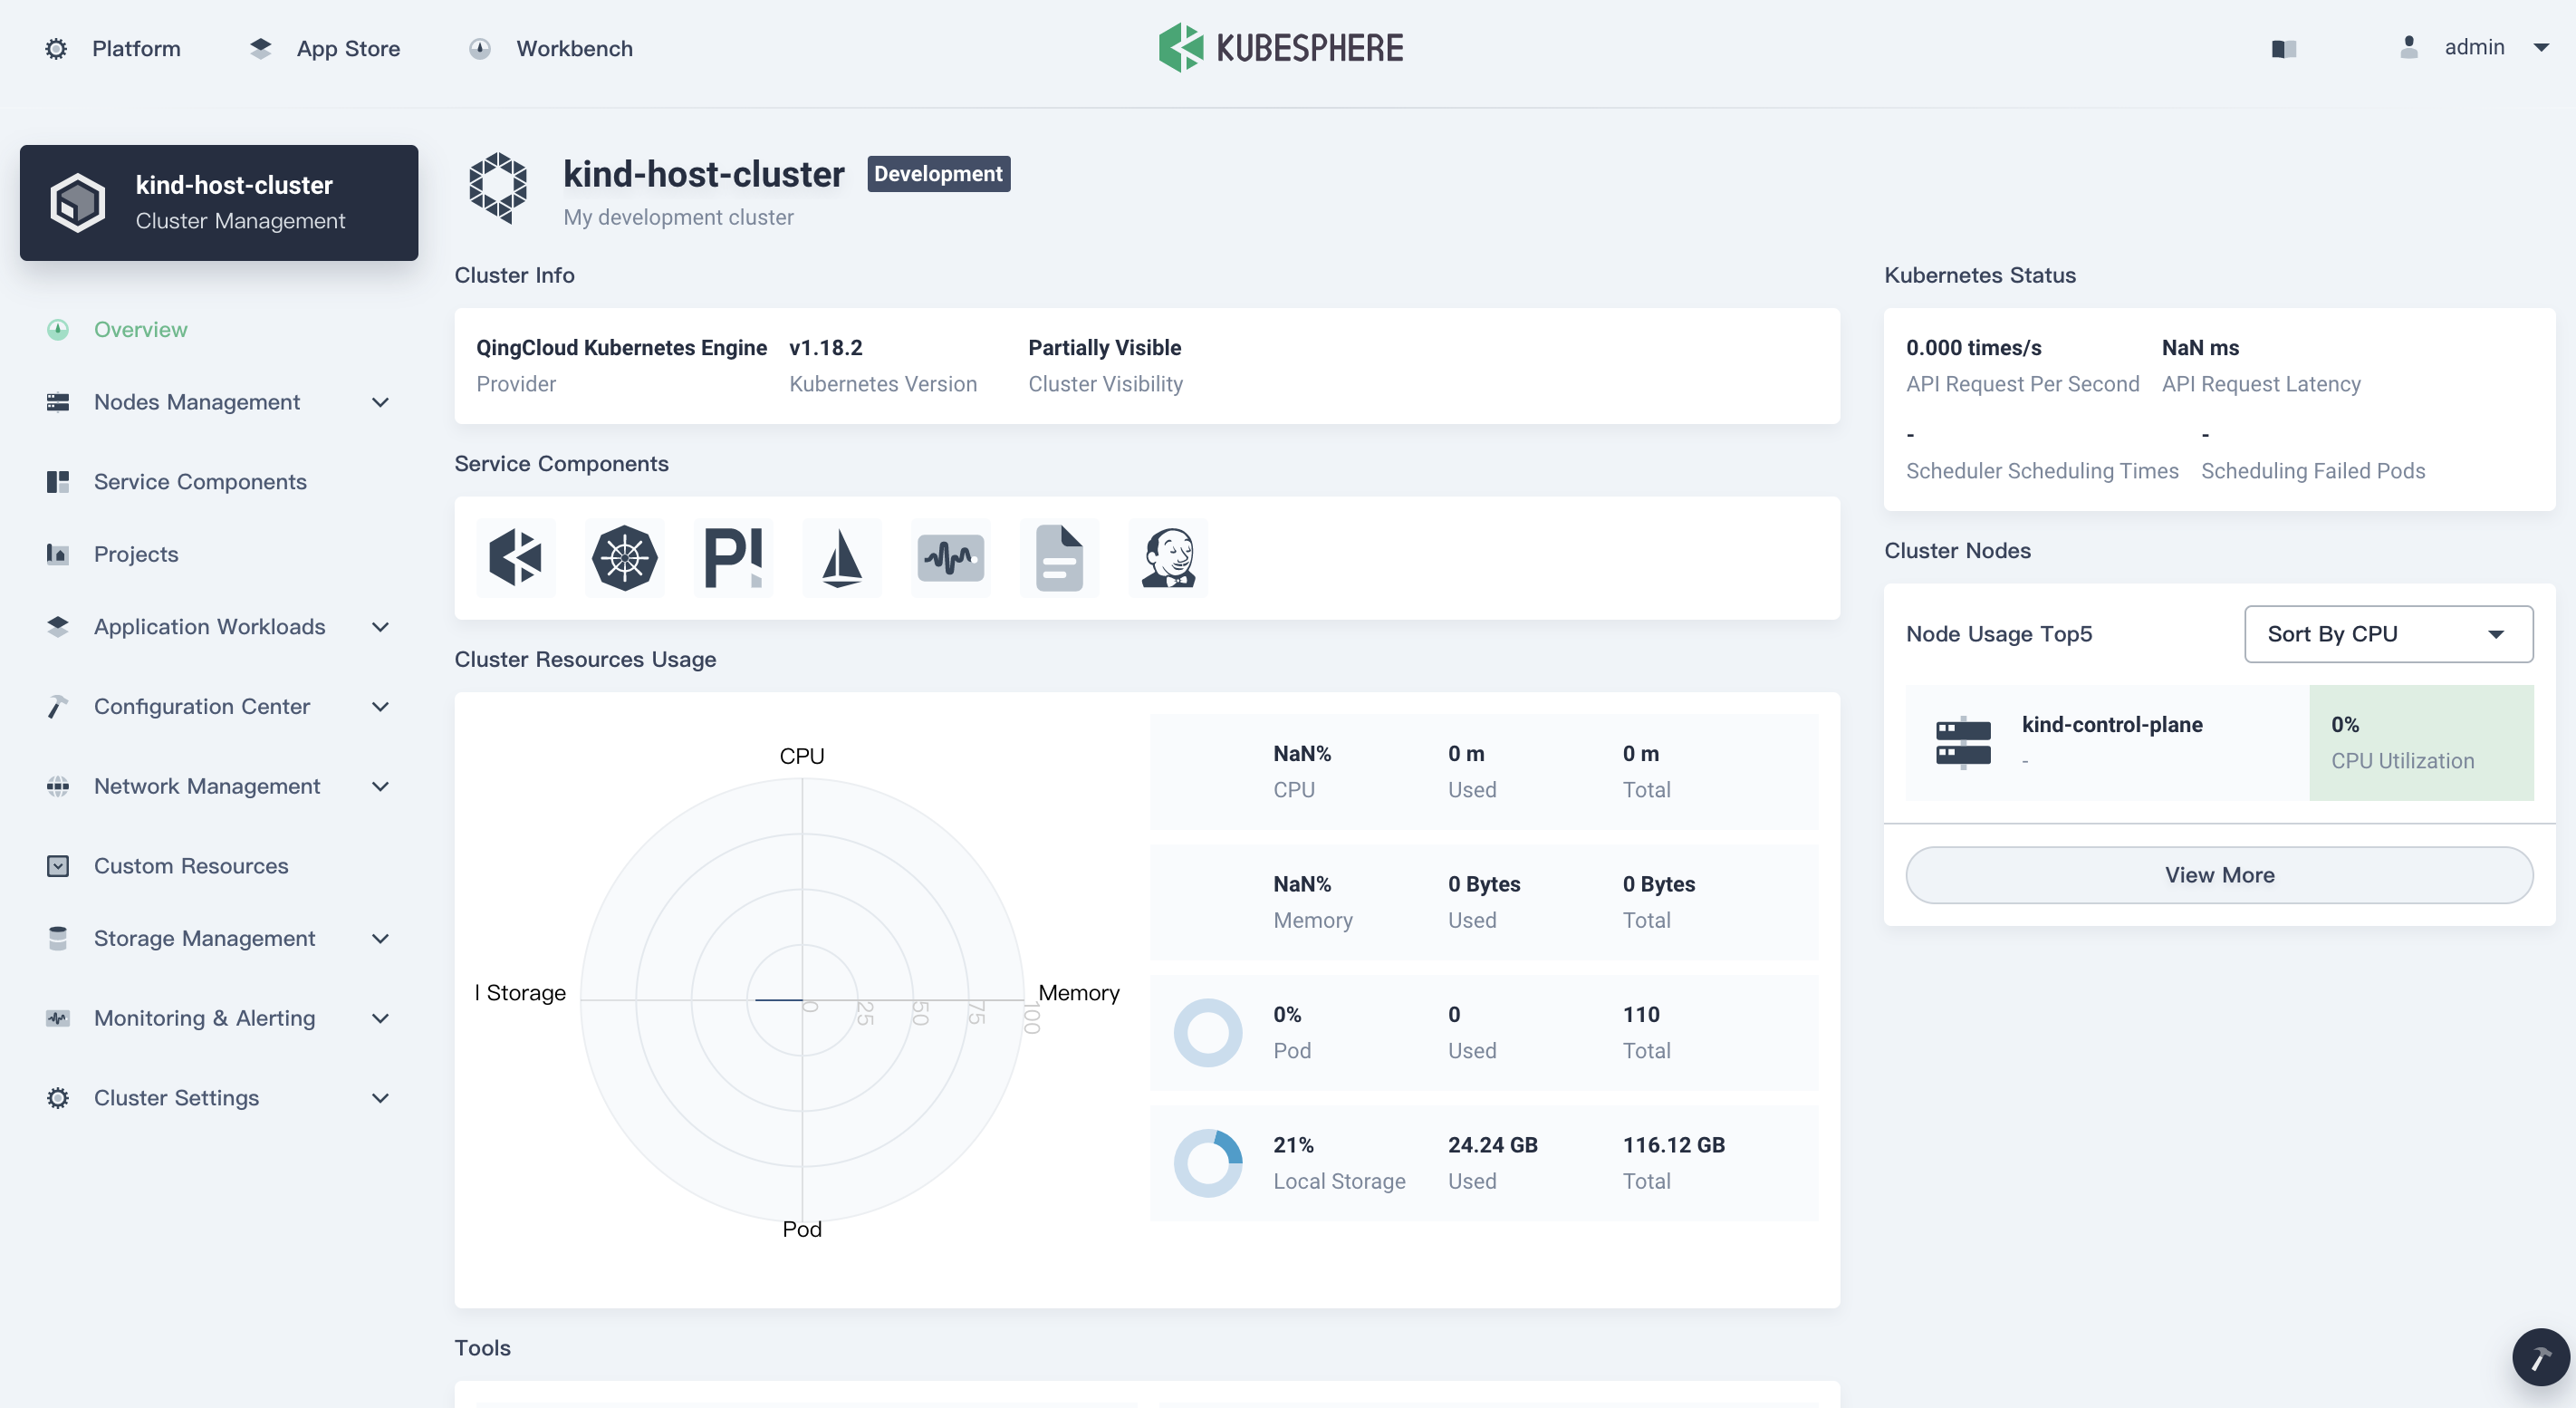
- Congratulation! When you see the cluster has imported into KubeSphere, you can enjoy it!
Import a member cluster
Same as above, we can continue to import a member cluster into multi-cluster control plane of KubeSphere.
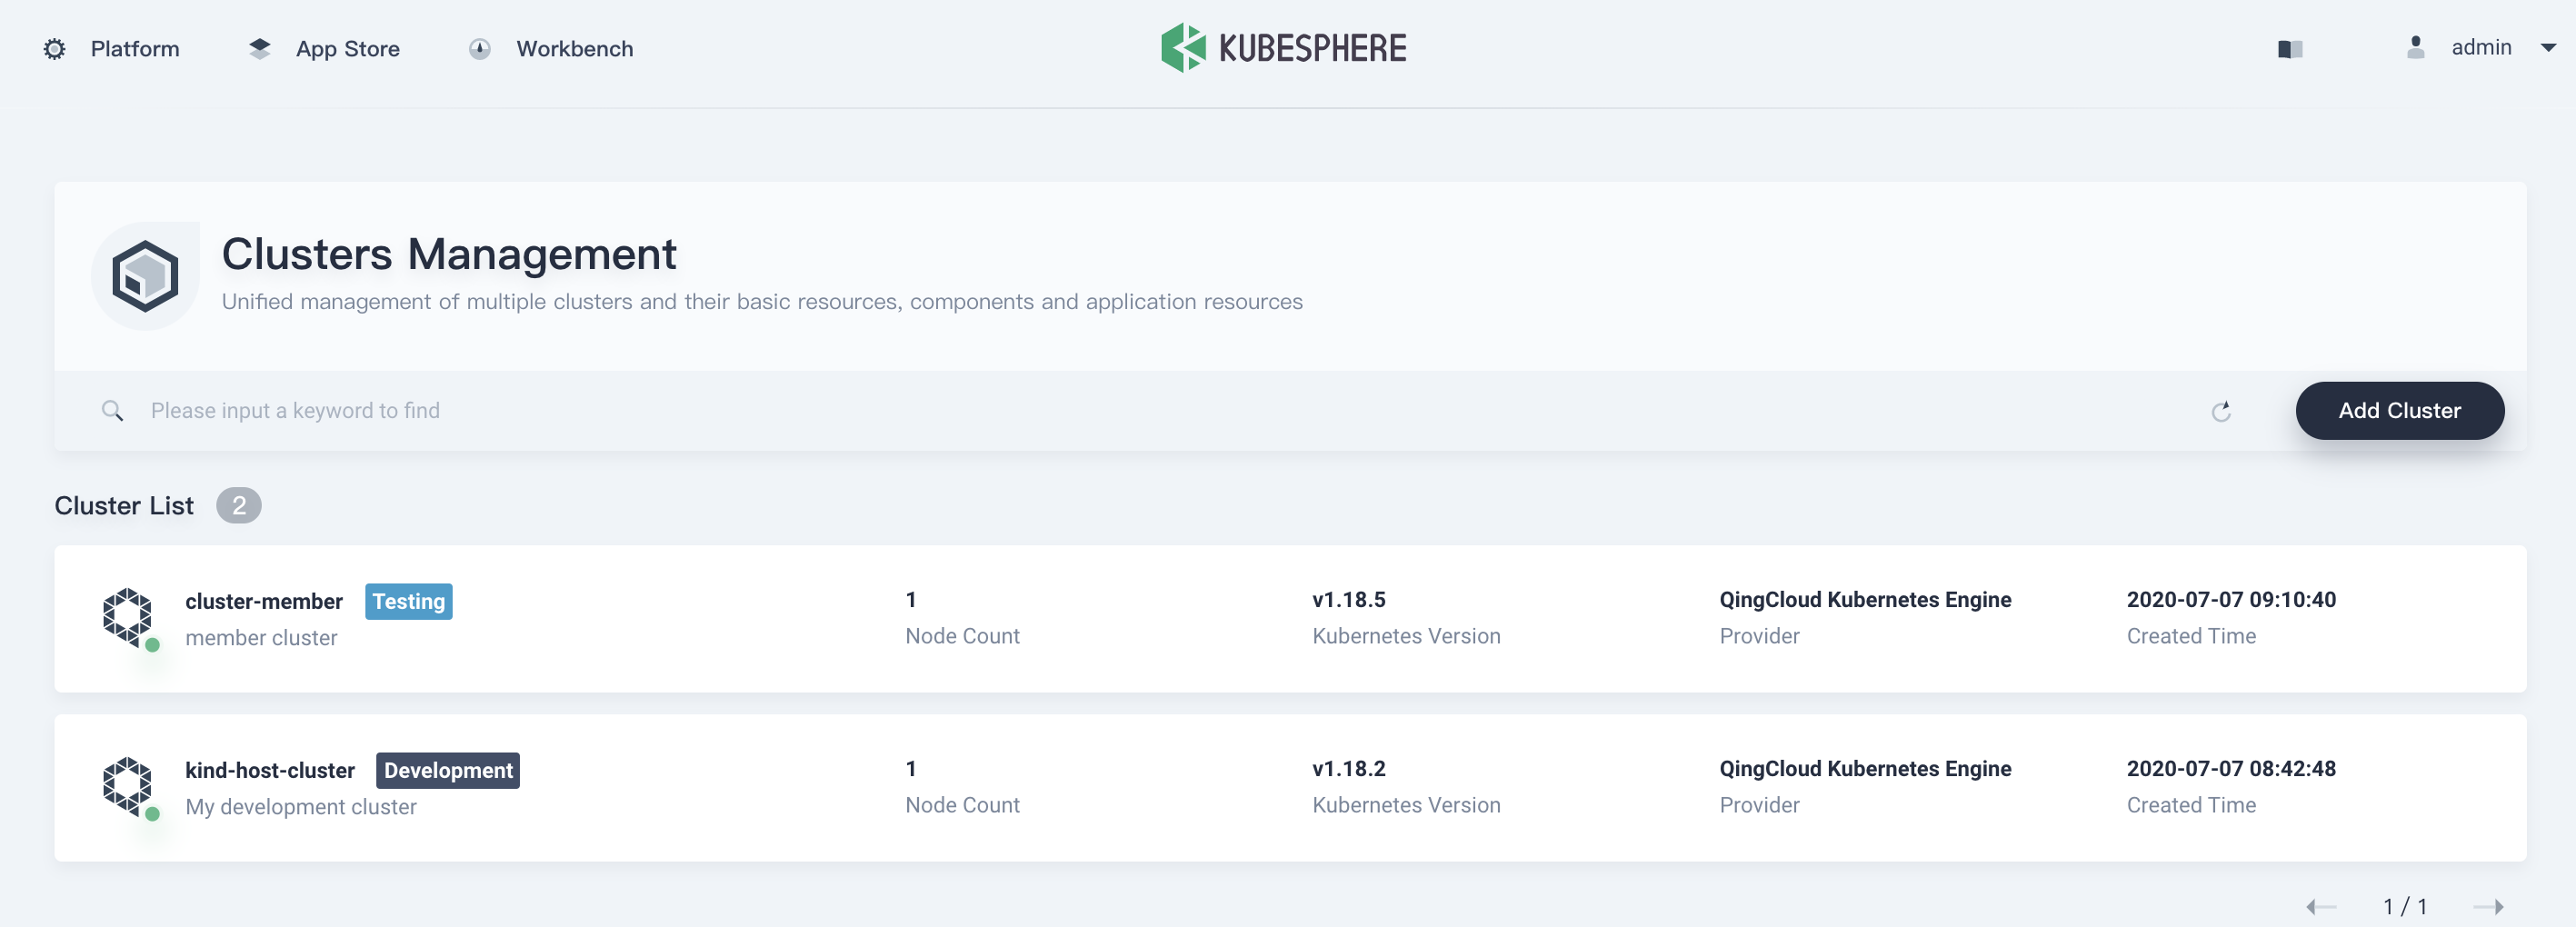
Cool! Wait for seconds, the member cluster dashboard is coming.